How Your Greeting Card Prototypes Can Help You Prevent Card Making Blunders
Get real life examples on how to use your card making prototypes to prevent stress and fix errors. Includes tips and tricks on how to create your own plus related card making instructions
Greeting card prototypes are simply greeting card sketches in three-dimensional-space. They are invaluable because they help you prevent mistakes, fix errors, and visualize the big picture better. Nonetheless, you don’t need them every time you make your very own greeting card. Hence, the key is figuring out where and when to use them.
For instance, if you are using card making instructions to make a greeting card, then you may not have to bother with this because the prototypes are already directly or indirectly incorporated into the instructions.
Either way, one cool thing about greeting card prototypes is that they are usually for your eyes only. Therefore, since no one else is supposed to see them, the card making prototypes:
- Don’t have to be pretty. This way, you can reuse materials that you wanted to throw away to make the greeting card models. Also, you can send the prototype to the trash or recycling bin after you are done with it.
- Don’t require the actual materials you intend to use for the card. This is useful especially if you have a limited quantity of materials or if you’re using expensive materials.
However, there are exceptions. Before getting to that, let’s first look at various applications of greeting card prototypes.
Card models can reveal exact sizes, dimensions, and relationships

There are times when your greeting card prototypes do not have to be proportional to the actual cards.
Nevertheless, when the goal of your greeting card model is to see how the sizes come together, then feel free to combine various sheets to get the right size you want.
For example, in the card making prototype I used for this birthday greeting card that looks like a purse, I joined two 8.5” x 11” sheets and then cut them down to size to get the desired 8” x 12” size.
Prototypes are the best ways to experiment
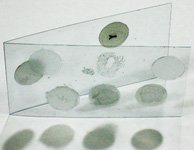
Here’s one proof that, sometimes, greeting card prototypes do not have to look anything like your card. This is especially true when you're experimenting to compare results.
For example, when I started working with plastics and transparent materials, I wasn’t sure how much flexibility the various liquid glues I had at the time would exhibit when dry or how they would look on transparent and translucent materials.
So I carried out experiments from which I learned that none of the liquid adhesives could satisfy both criteria. I then delayed my projects until I came across glue sheets which satisfied both requirements. In this case, the prototype saved me the stress of creating unusable greeting cards that would fall apart.
Card prototypes can become templates to guide your designs
Even though card making prototypes show you what to expect, there are times when you can use them as greeting card templates to help you work with abstract cards or specialty materials.
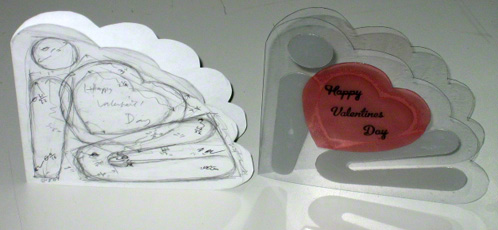
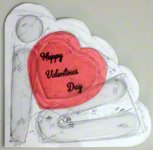
For instance, In this transparent Valentines Day card, I started with the sketch. However, when it was time to put all the parts together, I realized it was best to turn that design into a prototype and place it inside the card as a template for cutting the edges and showing where the various pieces fit.
Card models can reveal your project limitations
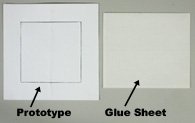
When this prototype revealed that the size of this unique wedding invitation that animates with a spin was too big for the glue sheets I intended to use, I had two options: either get larger glue sheets or reduce the size of the card. I was happy to choose the latter.
Why was I so happy? I was glad because this was not my initial intention for making the prototype. I made this prototype because I was concerned that the metal pin would make the card bulge out too much. So, you can imagine my excitement when it revealed another issue which I never even thought about.
As for my initial worries, the prototype confirmed my concerns: the wire was too thick. So I switched to a much thinner wire. Hence, I killed two birds with one stone and your prototypes will help you do the same.
Sometimes, one prototype is not enough
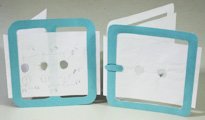
When your prototype reveals a flaw in your design, you can choose to make another prototype or jump right into the card. This decision depends on how satisfied you are with the first prototype.
On the other hand, whenever you’re not sure which design to pick from, then creating more than one prototype may help you decide. For instance, for this unique birthday card that looks like a belt, I created various greeting card designs and narrowed it down to two diagrams. However, when I couldn’t choose one, creating two prototypes eased my decision.
Prototypes can have detachable pieces
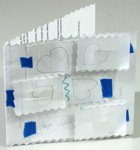
One way to prevent creating multiple greeting card prototypes is to make one that has detachable pieces. This way, you simply move the pieces around until you get the combinations you desire. Thus, to achieve this, try holding the parts together with temporary tape.
For this example, I haven’t decided how far or wide to place the rectangular pieces. Neither have I decided which of them will have thicker sections. Therefore, I’ve been moving every part of the card to help with that decision. I’ll surely post the finished card when I’m done so you can see how it turns out.
Exceptions to the rule
You’ve already seen why greeting card models don’t have to be pretty and why they don’t require the actual expensive materials you intend to use. Nevertheless, this is not always the case.
There are times when you just have to create the prototype with the intention of using it afterwards. This means, your final destination for the prototype is not the trash or recycle bin but the recipient’s hands.
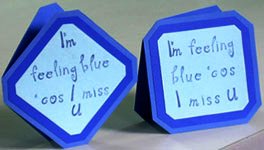
One example is this miss you card. On this project, the goal of the prototype was to show how the words on the cover would flow with the rest of the card elements. Therefore, it only made sense to create another card. By the way, which of them do you prefer? Cast your vote and see which one other visitors preferred?
For another example, when you have to use the actual materials to visualize the card, it only makes sense to turn the prototype into the actual card.
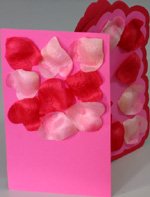
Nonetheless, when using these exceptions, work with caution. This is because when you make mistakes, it means you have to start all over. This is exactly what happened with this love card with petals.
On this project, the only way to visualize the three dimensional effects of the puffy petals was to use the actual petals in the prototype. Nevertheless, as shown in the picture, the first attempt didn't turn out as expected.
Whether you use prototypes or not, embrace the outcome!
The good thing about greeting card designs and prototypes is that, when you make mistakes, you learn from them and just start all over. That’s why they’re invaluable tools to use whenever you want to make your very own greeting card.
Nonetheless, don't let the thought of making mistakes scare you! Whether you decide to create greeting card prototypes or not, your card creations will still turn out great!
Recent Articles
-
Get Free Greeting Card Templates plus Ideas on How to Make Yours
Download Various Types of Greeting Card Templates and Get Options for Adapting Them. Includes Precautions and Proactive Steps to Help Prevent Messing Up Yours. -
Did You Notice the Revamped Homepage?
Indeed, it’s been a longtime coming, but the homepage makeover is finally here. For comparison, feel free to see the way it used to look as captured through the inescapable Wayback Machine Internet Ar… -
Free Card Greetings for Saying Hello and Goodbye in Your Greeting Card
Get ideas to personalize your greeting card salutations and valedictions because cool card greetings make great first impressions about your greeting card messages.



New! Comments
Have your say about what you just read! Leave us a comment in the box below.